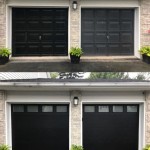
Painting a Metal Garage Door to Mimic a Wood Frame: A Comprehensive Guide
Metal garage doors offer durability and low maintenance, but their aesthetic can sometimes lack the warmth and character of natural wood. Faux wood finishes have become increasingly popular, providing the desired visual appeal without the complexities and upkeep associated with real wood. Achieving a convincing wood frame effect on a metal garage door requires careful planning, preparation, and execution. This article details the process of painting a metal garage door to simulate a wood frame, offering step-by-step instructions and best practices to ensure a professional-looking result.
Preparing the Metal Surface for Painting
Surface preparation is paramount for achieving a durable and aesthetically pleasing finish. The existing paint or coating on the metal garage door must be properly prepared to ensure adequate adhesion of the new paint layers. This process typically involves cleaning, sanding, and priming.
The first step involves thoroughly cleaning the entire surface of the garage door. Use a mixture of mild detergent and water, scrubbing the door with a sponge or soft brush to remove any dirt, grease, mildew, or other contaminants. Pay particular attention to areas that are frequently touched or exposed to the elements. Rinse the door thoroughly with clean water and allow it to dry completely. A pressure washer can be used for this step, but exercise caution to avoid damaging the existing paint or the metal surface itself. Maintain a safe distance and use a low-pressure setting.
Once the door is clean and dry, inspect it for any signs of rust or damage. Remove any rust with a wire brush or sandpaper. For more extensive rust, a rust converter or rust remover may be necessary. Follow the manufacturer's instructions carefully when using these products. Repair any dents or significant imperfections with an automotive body filler designed for metal. Apply the filler according to the manufacturer's instructions, allow it to dry completely, and then sand it smooth to blend seamlessly with the surrounding surface.
Sanding the existing paint surface is crucial for creating a keyed surface that will promote adhesion of the primer and paint. Use medium-grit sandpaper (around 220-grit) to lightly sand the entire surface of the door. The goal is not to remove the existing paint entirely, but rather to create a slightly roughened texture. Sand in a consistent direction to avoid creating swirl marks. After sanding, remove all sanding dust with a tack cloth or a damp cloth. Ensure the surface is completely clean and dry before proceeding to the next step.
Priming the metal surface is an essential step in achieving a durable and long-lasting paint job. Primer provides a uniform base for the paint to adhere to, and it also helps to prevent rust and corrosion. Choose a high-quality metal primer specifically designed for exterior use. Apply the primer evenly using a brush, roller, or paint sprayer. Follow the manufacturer's instructions regarding drying time and re-coat applications. In most cases, one or two coats of primer are sufficient. Allow the primer to dry completely before proceeding to the next step.
Creating the Wood Frame Effect with Paint
The next stage involves planning and executing the painting technique to create the illusion of a wood frame. This requires careful selection of paint colors, proper masking techniques, and an understanding of wood grain patterns.
Select two complementary paint colors: a base color that will represent the main body of the door and a darker color that will simulate the wood grain of the frame. Choose exterior-grade acrylic latex paint that is specifically designed for metal surfaces. Consider using paint with a satin or semi-gloss finish, as these finishes tend to be more durable and easier to clean. Test the chosen paint colors on a small, inconspicuous area of the door to ensure they provide the desired effect. Consider different shades of brown, beige, and tan for a realistic wood look. The darker color should have enough contrast to create definition in the grain.
Masking the area where the wood frame will be painted is crucial for achieving clean, defined lines. Use high-quality painter's tape to carefully mask off the perimeter of the garage door, creating the desired frame width. The width of the frame is a matter of personal preference, but a general guideline is to make it proportional to the size of the door. Typically, the frame width ranges from 4 to 8 inches. Ensure the tape is applied firmly and securely to prevent paint bleed-through. Use a putty knife or a credit card to press the tape firmly against the surface, especially along any edges or contours. Mask off any hardware, windows, or other features that you do not want to be painted.
Apply the base color to the areas that are not masked off. Use a brush, roller, or paint sprayer to apply the paint evenly. Apply thin, even coats rather than thick, heavy coats to avoid runs and drips. Allow each coat to dry completely before applying the next coat. Two coats of base paint are typically sufficient. Allow the base coat to dry according to the paint manufacturer's recommendation before applying the wood grain effect.
The wood grain effect is created by using various techniques to mimic the natural patterns found in wood. One popular method involves using a wood graining tool, which is a rubber or plastic tool with a textured surface. After applying the darker paint color to the masked-off areas, drag the wood graining tool through the wet paint to create a wood grain pattern. Experiment with different techniques and pressures to achieve the desired effect. Another method involves using a dry brush to stipple or feather the darker paint color onto the masked-off areas, creating a more subtle wood grain effect. Alternatively, a sea sponge can also be utilized to apply the darker paint. Each application will differ slightly creating an irregular "wood" effect. Remember to work quickly, as the paint will dry relatively quickly. If the paint dries too much, the graining tool may not work properly. Practice on a piece of cardboard or scrap metal before applying the technique to the garage door.
Finishing Touches and Protection
Once the wood grain effect is complete and the paint is dry, the final steps involve removing the masking tape, applying a protective clear coat, and reassembling any hardware that was removed during the preparation process.
Carefully remove the painter's tape, pulling it away from the painted surface at a 45-degree angle. This will help to prevent the paint from chipping or peeling. If any paint has bled under the tape, use a small brush to touch up the affected areas with the appropriate paint color. Inspect the entire painted surface for any imperfections, such as drips, runs, or uneven areas. Correct any imperfections with a small brush or sandpaper. Ensure the entire surface is smooth and uniform before proceeding to the next step.
Applying a protective clear coat is recommended to enhance the durability of the paint and to protect it from the elements. Choose an exterior-grade clear coat specifically designed for painted metal surfaces. Apply the clear coat evenly using a brush, roller, or paint sprayer. Follow the manufacturer's instructions regarding drying time and re-coat applications. One or two coats of clear coat are typically sufficient. The clear coat will provide a glossy or matte finish, depending on the type of clear coat chosen. A glossy clear coat will enhance the richness of the paint colors, while a matte clear coat will provide a more subtle and natural look.
Reinstall any hardware that was removed during the preparation process, such as handles, hinges, or decorative elements. Ensure all hardware is securely attached and properly functioning. Lubricate any moving parts, such as hinges and rollers, with a silicone-based lubricant to ensure smooth and quiet operation of the garage door. Inspect the weatherstripping around the perimeter of the door and replace it if necessary. This will help to seal the door and prevent drafts and water damage. Once all the finishing touches are complete, allow the paint and clear coat to fully cure according to the manufacturer's instructions. This may take several days or weeks, depending on the type of paint and clear coat used. Avoid washing or scrubbing the door during the curing process.
By following these steps and using high-quality materials, a metal garage door can be transformed into a visually appealing feature that mimics the look of a wood frame. The key to success lies in thorough preparation, careful execution, and attention to detail. Selecting proper materials is as important as following proper procedures.

How To Paint A Door Look Like Wood It S Easier Than You Think Average But Inspired

How To Paint A Door Look Like Wood 7 Shade Options

How To Paint A Garage Door Look Like Wood

How To Paint A Door Look Like Wood 7 Shade Options

Faux Wood Garage Door Tutorial Prodigal Pieces

How To Paint A Door Look Like Wood 7 Shade Options

How To Paint A Door Look Like Wood 7 Shade Options

How To Make A Metal Door Look Like Wood With Zar Stain

Steel Garage Doors That Look Like Wood Costs Pros Cons

Create A Faux Wood Garage Door With Gel Stain Crazy Life Littles
Related Posts


