How To Reset a Chamberlain Garage Door Remote
Garage door remotes provide a convenient way to access a property. Chamberlain is a prominent manufacturer of garage door openers and remotes, known for their reliability and security features. However, situations arise where resetting a Chamberlain garage door remote becomes necessary. This could be due to various reasons, including a lost connection with the garage door opener, a need to reprogram after replacing the remote battery, or security concerns necessitating the clearing of previous programming.
Resetting a Chamberlain garage door remote involves clearing the existing programming and re-establishing a connection between the remote and the garage door opener unit. The process varies slightly depending on the specific model of the remote and garage door opener. Therefore, consulting the owner's manuals for both devices is recommended. The following information provides a general guide to the most common methods.
Identifying the Learn Button
The primary method for programming or resetting a Chamberlain garage door remote relies on locating and utilizing the "Learn" button on the garage door opener unit. This button is typically found on the back or side of the opener unit, near the antenna wire. It is usually a colored button, with common colors including yellow, red, orange, purple, or green. The color of the button often corresponds to the type of security technology used by the garage door opener system. Identifying the correct “Learn” button is crucial for successfully completing the reset and reprogramming process.
Prior to initiating the reset procedure, ensure the garage door is closed and there are no obstructions in its path. Clearing the area around the garage door is a safety precaution. Furthermore, disconnect any existing vehicles parked in the garage in case the door operates unexpectedly during the reset process. This helps prevent any accidental damage or injury.
Once the “Learn” button has been located, familiarize oneself with its appearance and surrounding area. Some openers may have an indicator light near the button that illuminates or blinks to signal the programming mode is active. Some models require a specific sequence of button presses to initiate the learn mode instead of just a single press. Review your opener's manual to understand specifically how the “Learn” button functions for your model.
The specific location and appearance of the "Learn" button can vary slightly depending on the model of the Chamberlain garage door opener. For older models, the button might be hidden behind a light cover or a removable panel. Newer models often feature a more easily accessible button. If difficulties arise in locating the "Learn" button, consulting the opener's user manual or the Chamberlain website for detailed diagrams and instructions is a viable solution.
Clearing Existing Programming (Master Reset)
In situations where security is a concern, or when multiple remotes need to be reprogrammed simultaneously, performing a master reset on the garage door opener unit can be beneficial. This action clears all previously programmed remotes and keypads from the opener's memory, requiring each device to be individually reprogrammed. To execute a master reset, locate the “Learn” button on the garage door opener unit. Press and hold the “Learn” button for approximately six to ten seconds until the indicator light, if present, goes out. This action typically erases the stored memory of all previously programmed devices.
After performing the master reset, test existing remotes to confirm they no longer operate the garage door. This step verifies the successful completion of the reset process. If the remotes still function after the reset, repeat the process, ensuring that the "Learn" button is held for the appropriate duration. If the problem persists, inspect the opener's main circuit board for any damage or contact a qualified technician.
It is important to note that performing a master reset will require reprogramming all desired remotes and keypads. Plan accordingly and have all remotes readily available for reprogramming following the reset. The reprogramming process is generally the same as the initial programming procedure described in subsequent sections.
Some Chamberlain garage door opener models might not have the master reset functionality. If the owner’s manual does not mention how to perform a master reset, there might not be one. In this case, reprogramming each remote individually might be necessary. Additionally, some smart garage door openers linked to MyQ accounts necessitate removal of the garage door opener through the MyQ account before performing a hard factory reset. Failing to do so might prevent the remote from properly connecting to the opener. Consult the MyQ app and Chamberlain support resources for detailed guidance.
Reprogramming the Garage Door Remote
After resetting the remote or performing a master reset on the garage door opener, the remote needs to be reprogrammed to communicate with the opener unit. The following steps describe the typical reprogramming procedure. First, ensure the garage door is closed. Locate the "Learn" button on the garage door opener unit, as described earlier. Press and release the “Learn” button. An indicator light near the button should illuminate or blink, indicating that the opener is in programming mode.
Within 30 seconds of pressing the "Learn" button, press and hold the button on the remote that you want to use to operate the garage door. Hold the button until the garage door opener's light flashes or you hear a click from the opener unit. This indicates that the remote's signal has been received and the remote is now programmed. Some models may require pressing the remote button a second or even a third time to complete the programming process. Consult the user manuals for both the remote and the opener for specific instructions.
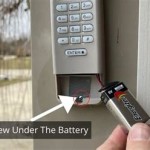
After the garage door opener light flashes or clicks, release the button on the remote. Wait a few seconds and then press the programmed button on the remote again to test the connection. The garage door should open or close. If the door does not respond, repeat the programming process, ensuring that the “Learn” button is pressed correctly and the remote button is held for the appropriate duration. Also, ensure the remote’s battery is new and strong. A weak battery can impact the signal strength and prevent successful programming.
If the remote still fails to program after multiple attempts, there might be an issue with the remote or the garage door opener unit. Check the remote's battery and ensure it is properly installed. Inspect the remote for any visible damage. If the remote appears to be in good condition, the problem might lie with the opener unit. Check the antenna wire for damage or loose connections. If the opener unit is experiencing power issues, consult a qualified technician for assistance.
For Chamberlain garage door openers equipped with rolling code technology, the remote codes change each time the remote is used. This enhances security by preventing unauthorized access. During the programming process, ensure that the remote is within a reasonable range of the opener unit to ensure a strong signal. Metal objects or other electronic devices can interfere with the signal. If encountering difficulties programming the remote from a specific location in the garage, try moving closer to the opener unit.
In some cases, the remote may need to be activated to complete the programming process. This typically involves pressing and holding a specific button combination on the remote. The activation process can vary depending on the remote model. Consult the remote's user manual for instructions on how to activate the remote after programming. After activation, test the remote again to ensure it is functioning correctly. If the remote still does not work, review the programming steps and repeat the process, paying close attention to the timing and button presses. If the problem persists, consider replacing the remote with a new one.
Programming multiple remotes follows the same basic procedure as programming a single remote. After programming one remote, repeat the process for each additional remote, pressing the “Learn” button on the opener unit and then pressing the button on the respective remote. It is important to remember that each remote needs to be programmed individually. A master reset clears all the remotes so all remotes need to be reprogrammed.
If experiencing persistent difficulties programming the remote, reaching out to Chamberlain customer support is a suitable option. The company's representatives can provide detailed troubleshooting assistance and guide through the programming process. Providing the model numbers of both the remote and the opener unit when contacting customer support can expedite the resolution process.

How To Reset Remote Or Keypad Access Pin For Chamberlain Liftmaster Craftsman Garage Door Opener

Programming A Chamberlain Garage Door Opener Easy Steps

How To Program Chamberlain Universal Mini Remote Control

Programming A Chamberlain Garage Door Opener Easy Steps

How To Program A Remote For Chamberlain Liftmaster Craftsman Garage Door Opener Setup Process

How To Program A Garage Door Remote Change Battery Liftmaster Chamberlain

B6713t Corner To Lighting Led Wi Fi Ultra Quiet Battery Backup Garage Door Opener Chamberlain

Reset Chamberlain Garage Door Opener Code Diy Home Improvement Forum

Klik5u Bk2 Original Er Universal Garage Door Remote Chamberlain

How To Program Chamberlain S 950estd And 953estd Remote Controls A Garage Door Opener
Related Posts