How To Prepare Ground For Concrete Garage Floor
A properly prepared base is crucial for a durable and long-lasting concrete garage floor. Inadequate preparation can lead to cracking, settling, and other issues that compromise the structural integrity and longevity of the slab. This guide outlines the essential steps for preparing the ground for a concrete garage floor, ensuring a solid foundation for years to come.
1. Mark and Excavate the Area
Begin by accurately marking the perimeter of the garage floor using stakes and string. Ensure the dimensions match the planned structure and account for the thickness of the concrete slab, typically around 4 inches. Once the area is clearly marked, excavation can begin. The depth of the excavation will depend on the total thickness of the base materials and the concrete slab itself. It’s crucial to excavate to a uniform depth across the entire area to ensure a level and stable base.
2. Compact the Subgrade
After excavation, the exposed soil, known as the subgrade, must be compacted. Compaction increases the soil's density, minimizing future settling and providing a stable foundation. A hand tamper can be used for smaller areas, but a mechanical plate compactor is recommended for larger garage floors. The subgrade should be compacted in layers, typically 4-6 inches at a time, until a firm and unyielding surface is achieved. Proper compaction is critical for preventing future cracks and settlement in the concrete slab.
3. Install a Gravel Base
A layer of gravel, typically crushed stone or gravel, forms the base upon which the concrete slab will rest. This gravel base further enhances stability, improves drainage, and helps to prevent frost heave in colder climates. The recommended thickness of the gravel base is typically 4-6 inches. Spread the gravel evenly across the compacted subgrade and compact it thoroughly using a plate compactor. This creates a strong and level base for the concrete.
4. Add and Compact a Sand Layer (Optional but Recommended)
While not always necessary, a layer of sand on top of the gravel base can further refine the base and provide a smoother surface for the vapor barrier placement. A 2-inch layer of coarse sand is typically sufficient. Spread the sand evenly over the compacted gravel and compact it lightly. This sand layer assists in leveling any minor irregularities in the gravel base and creates a more uniform surface for the concrete.
5. Install a Vapor Barrier
Moisture migrating up from the ground can cause issues with the concrete, such as cracking and efflorescence. A vapor barrier, typically a sheet of heavy-duty polyethylene plastic, prevents this moisture migration. Overlap the sheets of the vapor barrier by at least 6 inches and seal the seams with tape. Extend the vapor barrier up the sides of the excavation, beyond the planned height of the concrete slab, to create a complete moisture barrier. This crucial step safeguards the concrete from moisture-related problems.
6. Install Forms and Reinforcement
Forms, typically made of wood or metal, define the perimeter of the concrete slab and contain the concrete during pouring. Securely stake the forms in place to prevent movement during the concrete pour. Reinforcement, such as wire mesh or rebar, strengthens the concrete slab and helps prevent cracking. Place the reinforcement on supports within the forms, ensuring it is positioned in the middle third of the slab thickness. Proper formwork and reinforcement are essential for maintaining the shape and integrity of the concrete slab.
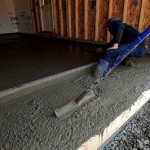
7. Prepare for Concrete Placement
Once the forms and reinforcement are in place, the site is ready for concrete placement. Ensure easy access for the concrete truck and have all necessary tools, such as screeds and floats, ready. Inspect the entire area one final time to verify the accuracy of the forms, the levelness of the base, and the proper placement of the vapor barrier and reinforcement. Thorough preparation before the concrete arrives ensures a smooth and efficient pouring process.

Prep Work Before Installing A Concrete Floor Garage

Preparing Concrete Floors For Coating

How To Prepare A Garage Floor For Paradigm Concrete

How To Clean Prep And Coat A Garage Floor

Concrete Garage Floor Slabs What You Need To Know About Preparing For One Miracle Truss

Prep Work Done Before Pouring A Concrete Floor Vapor Barrier Wire Mesh Iso Strip Styrofoam

How To Prep Concrete For Floor Guide

Proper Concrete Preparation Garagefloorcoating Com

How To Build Concrete Garage Base Lidget Compton

Process Of Flooring Surface Preparation Garage Designs St Louis
Related Posts