How To Install Saferacks Overhead Garage Storage
Saferacks overhead garage storage systems offer a robust and versatile solution for maximizing vertical space. Proper installation is crucial for safety and optimal performance. This guide outlines the steps involved in installing a typical Saferacks overhead storage unit. Note that specific instructions may vary depending on the model, so always consult the manufacturer's provided manual.
Planning and Preparation
Before beginning the installation, careful planning and preparation are essential. This includes:
- Inventory Check: Confirm all components listed in the manual are present and undamaged.
- Ceiling Joist Location: Identify and mark the ceiling joists where the storage unit will be mounted. Use a stud finder to ensure accuracy. Understanding the joist layout is vital for secure anchoring.
- Safety Gear: Gather necessary safety equipment, including safety glasses, gloves, and a dust mask.
- Tool Assembly: Assemble the required tools, such as a drill, measuring tape, level, socket wrench set, and ladder.
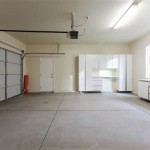
- Clear the Area: Remove any obstructions from the installation area to ensure safe and efficient workflow.
Assembling the Mounting Brackets
The mounting brackets form the foundation of the overhead storage system. Accurate assembly ensures the unit's stability.
- Bracket Alignment: Align the brackets according to the manufacturer's instructions. Ensure proper orientation for secure attachment to the ceiling joists.
- Hardware Insertion: Insert the designated bolts and washers into the pre-drilled holes in the brackets. Do not tighten completely at this stage.
- Bracket Connection: Connect the bracket components as indicated in the manual, forming the complete mounting assembly.
Installing the Mounting Brackets to the Ceiling
Securing the mounting brackets to the ceiling joists is a critical step. Proper techniques guarantee the system's load-bearing capacity.
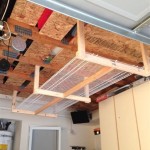
- Bracket Positioning: Position the assembled brackets against the ceiling joists at the marked locations. Ensure the brackets are flush with the bottom of the joists.
- Pre-Drilling Pilot Holes (if necessary): Depending on the ceiling material, pre-drilling pilot holes may be necessary to prevent wood splitting. Consult the manual for guidance.
- Securing with Bolts: Drive the provided lag bolts or wood screws through the brackets and into the ceiling joists. Tighten securely using a socket wrench or drill.
- Leveling: Verify the brackets are level in both directions using a level. Adjust as necessary before fully tightening the bolts.
Assembling the Storage Platform
With the mounting brackets securely installed, assembling the storage platform is the next phase.
- Frame Connection: Connect the frame components of the storage platform according to the assembly instructions provided. This typically involves aligning designated holes and inserting bolts or other fastening hardware.
- Decking Installation: Install the decking material onto the assembled frame, ensuring proper alignment and secure fastening. This creates the storage surface.
- Support Beams (if applicable): Some models include additional support beams for increased load capacity. Install these according to the manufacturer's guidelines.
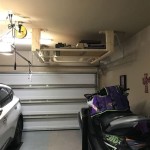
Raising and Securing the Storage Platform
Lifting and securing the platform to the mounting brackets completes the main installation process.
- Lifting Assistance: Use appropriate lifting methods, such as a hoist or assistance from another person, to raise the assembled platform to the mounting brackets. Be mindful of weight distribution and safety precautions.
- Platform Alignment: Carefully align the platform with the mounting brackets, ensuring correct positioning for secure attachment.
- Final Securing: Attach the platform to the brackets using the designated hardware, following the instructions provided in the manual. Tighten all bolts securely.
Safety Checks and Final Adjustments
Before utilizing the storage system, performing final safety checks is paramount.
- Stability Test: Gently apply pressure to various points on the platform to confirm its stability and secure attachment to the ceiling.
- Hardware Check: Double-check that all bolts and fasteners are tightly secured and that no components are loose or damaged.
- Weight Capacity Adherence: Ensure the stored items do not exceed the unit's specified weight capacity as outlined in the manual.

Saferacks Installation And Assembly Instructional

How Long Does It Take To Install An Overhead Storage Rack Saferacks

Overhead Garage Storage Racks Installation Saferacks

Installing Costco 4x8 Saferacks For Overhead Garage Storage Save 700 Tax

Small Single J Hook Walltrax

Saferacks Overhead Garage Storage Rack Installation Service

How To Install Overhead Garage Storage System Time Lapse Organized Series

Saferacks 2 Ft X 8 Overhead Garage Storage Rack And Accessories Kit Costco

Saferacks Overhead Garage Storage Rack Installation Service

Saferacks Overhead Garage Storage Rack Installation Service
Related Posts