How To Install An Entry Door In A Garage
Adding an entry door to a garage, separate from the main garage door, can offer several benefits, including improved accessibility, enhanced security, and the potential to create a more functional and adaptable space. This article provides a comprehensive guide on how to install an entry door in a garage, covering essential steps, tools, and considerations to ensure a successful project.
Before commencing the installation, it is crucial to assess the structural integrity of the garage and obtain any necessary permits from local authorities. Building codes often regulate door placement, fire safety, and other aspects of construction. Failure to adhere to these regulations can result in fines or necessitate rework.
Furthermore, determine the optimal location for the entry door. Factors to consider include proximity to existing pathways, the intended use of the door, and potential obstructions within the garage. Ensure sufficient space for the door to swing open fully without impeding movement or access to other areas.
Once the location has been determined and necessary permits secured, the following tools and materials will be required:
* Entry door and frame assembly * Measuring tape * Level * Pencil * Safety glasses * Work gloves * Circular saw or reciprocating saw * Drill with various drill bits * Hammer * Screwdriver (both flathead and Phillips head) * Fasteners (screws, nails) * Shims * Caulk * Insulation (optional) * Exterior trim (optional)Preparing the Opening
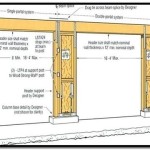
The first key step involves preparing the opening in the garage wall. This process requires precision and attention to detail to ensure the door frame will fit properly and securely. Start by accurately measuring the dimensions of the door frame. Add approximately ½ inch to these measurements to allow for shimming and adjustments during installation. This extra space provides the flexibility to fine-tune the door's alignment and ensure smooth operation.
Using a pencil and level, mark the outline of the door opening on the garage wall. Double-check the measurements to confirm accuracy before proceeding to the next step. It is vital to ensure the opening is square and plumb for proper door function.
With the outline marked, carefully cut through the garage wall along the marked lines using a circular saw or reciprocating saw. If the garage wall is made of concrete or brick, a concrete saw or hammer drill with a chisel attachment may be necessary. Take precautions to avoid cutting through any existing wiring or plumbing within the wall. If any utilities are present, consult with a qualified professional before proceeding further.
Once the initial cut is complete, remove any existing framing or insulation within the opening. Inspect the surrounding structure for any signs of damage or weakness. Repair or reinforce any compromised areas before continuing the installation. This step is crucial to ensure the structural integrity of the door frame and prevent future problems.
With the opening cleared, install a header above the door opening to provide structural support. The header's size and type will depend on the width of the opening and the load it needs to bear. Consult with a building professional or refer to local building codes to determine the appropriate header for your specific situation. Secure the header to the surrounding framing using appropriate fasteners.
Finally, ensure the opening is clean and free of debris before proceeding to the next step. Vacuum or sweep away any dust, wood shavings, or other materials that could interfere with the door frame installation.
Installing the Door Frame
The second key step involves installing the door frame. This is a critical process that significantly impacts the door's functionality and longevity. With the opening prepared, carefully lift the door frame into place. Ensure the frame is centered within the opening and properly aligned with the header and surrounding wall studs.
Use shims to level and plumb the door frame. Insert shims between the frame and the surrounding studs at various points to achieve a perfectly level and plumb installation. Use a level to check both the horizontal and vertical alignment of the frame. Adjust the shims as needed until the frame is perfectly aligned.
Once the frame is level and plumb, secure it to the surrounding studs using screws. Use screws that are long enough to penetrate the studs securely. Pre-drill pilot holes to prevent the wood from splitting. Start by securing the top of the frame to the header, then work your way down the sides, ensuring the frame remains level and plumb throughout the process.
Check the door frame for squareness by measuring the diagonals. If the diagonals are equal, the frame is square. If they are not equal, adjust the shims until the frame is square. A square frame is essential for proper door operation and preventing drafts.
After the frame is securely fastened, inspect the shims and trim any excess material with a utility knife or saw. This will create a clean and professional look.
Apply caulk around the perimeter of the door frame to seal any gaps and prevent air and water infiltration. Use a high-quality exterior-grade caulk that is paintable and durable. Smooth the caulk with a wet finger or a caulk smoothing tool for a professional finish.
Hanging the Door and Final Adjustments
The third key step involves hanging the door slab and making the final adjustments. This requires careful attention to detail and precise alignment to ensure smooth operation and a secure seal.
Carefully lift the door slab into the door frame. Align the hinges on the door slab with the corresponding hinges on the door frame. Insert the hinge pins to secure the door slab to the frame. Ensure the hinge pins are fully inserted and properly seated to prevent the door from sagging or becoming misaligned.
Test the door's swing to ensure it opens and closes smoothly without binding or rubbing against the frame. If the door binds, adjust the shims behind the hinges to change the door's alignment. Tighten or loosen the hinge screws as needed to fine-tune the door's position.
Install the door handle and lockset according to the manufacturer's instructions. Ensure the lock aligns properly with the strike plate on the door frame. Test the lock to ensure it engages and disengages smoothly and securely.
If necessary, adjust the strike plate to ensure the door closes tightly and the lock engages properly. Loosen the strike plate screws and reposition it slightly until the door closes securely. Tighten the screws to secure the strike plate in its new position.
Install weatherstripping around the perimeter of the door frame to create a tight seal and prevent drafts. The type of weatherstripping will depend on the door frame and the climate. Follow the manufacturer's instructions for installation. Ensure the weatherstripping is properly aligned and securely attached to the door frame.
Optionally, install exterior trim around the door frame to enhance its appearance and provide additional protection from the elements. Choose trim that complements the style of the garage and the surrounding architecture. Secure the trim to the door frame and the surrounding wall using nails or screws. Caulk the seams between the trim and the wall to prevent water infiltration.
Finally, inspect the entire installation for any remaining gaps or imperfections. Touch up any paint or caulk as needed to create a finished and professional look. Ensure the door opens and closes smoothly, locks securely, and is weather-tight.
By following these steps carefully and paying attention to detail, a homeowner can successfully install an entry door in a garage, enhancing its accessibility, security, and overall functionality.
Regular maintenance, including lubricating hinges and applying fresh caulk as needed, will prolong the life of the entry door and ensure its continued performance.

How To Install An Exterior Door In Minutes

Installing An Exterior Door How To

Installing An Exterior Door How To

How To Replace An Exterior Door Diy Family Handyman

How To Install A Exterior Door

How To Install An Exterior Door The Home Depot

How To Install A Prehung Exterior Door Lowe S

How To Replace Garage Door With French Doors And Sidelites Hydrangea Treehouse

How To Install An Exterior Entry Door Construction Repair Wonderhowto

How To Replace Garage Door With French Doors And Sidelites Hydrangea Treehouse
Related Posts