How To Hang Bikes In Garage: A DIY Guide
Many homeowners find themselves grappling with limited garage space, often cluttered with vehicles, tools, and recreational equipment. Bicycles, while enjoyable for leisure and exercise, can contribute significantly to this clutter. Implementing a DIY bike storage solution, specifically hanging bikes in the garage, proves an effective method to reclaim valuable floor space and organize the area. This article provides a comprehensive guide on how to hang bikes in a garage using DIY methods, detailing the necessary materials, safety precautions, and step-by-step instructions.
Before embarking on the project, a thorough assessment of the garage structure and available space is essential. Factors such as ceiling height, wall material (drywall, concrete, wood studs), and proximity to garage door mechanisms or other utilities must be considered. This preliminary evaluation will influence the choice of hanging method and the type of hardware required.
Choosing the Right Bike Hanging Method
Several methods exist for hanging bikes in a garage, each with its own advantages and disadvantages. The selection depends largely on individual preferences, budget constraints, and the structural characteristics of the garage. Common options include ceiling-mounted hooks, wall-mounted racks, and pulley systems.
Ceiling-Mounted Hooks: This method typically involves installing hooks directly into the ceiling joists and hanging the bikes by the front or rear wheel. It is a relatively inexpensive and simple solution, but requires sufficient ceiling height to prevent the bikes from obstructing movement within the garage. It's crucial to locate solid ceiling joists, usually 16-24 inches apart, to ensure secure mounting. Avoid attaching hooks solely to drywall, as it lacks the necessary structural integrity to support the weight of a bicycle.
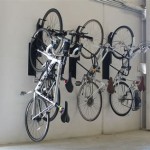
Wall-Mounted Racks: Wall-mounted racks offer a more versatile solution, allowing bikes to be hung horizontally or vertically. Horizontal racks, while saving vertical space, require sufficient wall length. Vertical racks, conversely, minimize wall space usage but require adequate ceiling height. These racks often feature padded arms to protect the bike frame from scratches. Proper installation necessitates securing the rack to wall studs using appropriate screws or bolts. Again, avoid relying solely on drywall anchors unless the rack is specifically designed for lightweight items and the bikes are exceptionally light.
Pully Systems: Pulley systems provide a mechanical advantage, enabling effortless lifting and lowering of bikes, especially heavier models. These systems typically consist of ropes, pulleys, and hooks that attach to the bike’s handlebars and seat. They are ideal for individuals who may struggle to lift bikes directly. The installation process involves attaching the pulley system to the ceiling joists, ensuring that the ropes are securely fastened and the lifting mechanism operates smoothly. Regular inspection and maintenance of the ropes are crucial to prevent breakage or slippage.
Gathering Required Materials and Tools
Once the hanging method is chosen, the next step involves acquiring all necessary materials and tools. A comprehensive list ensures a smooth and efficient installation process. The following items are generally required, but may vary depending on the specific method chosen:
For Ceiling-Mounted Hooks:
- Heavy-duty coated hooks (capable of supporting the weight of the bicycles)
- Drill with appropriate drill bits (for drilling pilot holes and securing screws)
- Stud finder (to locate ceiling joists)
- Screws or lag bolts (of appropriate length and diameter for securing hooks to joists)
- Measuring tape
- Pencil
- Safety glasses
For Wall-Mounted Racks:
- Wall-mounted bike rack (of desired type and capacity)
- Drill with appropriate drill bits
- Stud finder
- Screws or bolts (of appropriate length and diameter for securing rack to studs)
- Level
- Measuring tape
- Pencil
- Safety glasses
For Pulley Systems:
- Bike pulley system (rated for the weight of the bicycles)
- Drill with appropriate drill bits
- Stud finder
- Screws or bolts (of appropriate length and diameter for securing system to joists)
- Wrench (for tightening bolts)
- Measuring tape
- Pencil
- Safety glasses
It's advisable to purchase high-quality hardware to ensure the safety and longevity of the bike storage system. Using substandard materials can lead to premature failure and potential damage to the bikes or the garage structure. Always consult manufacturer recommendations for specific hardware requirements.
Step-by-Step Installation Guide
Following a structured installation process is crucial for achieving a secure and aesthetically pleasing bike storage solution. The following steps provide a general guideline, but may need to be adapted based on the chosen method and specific garage conditions:
Step 1: Locate and Mark Studs/Joists: Using a stud finder, locate the ceiling joists or wall studs. Mark their positions clearly with a pencil. This is crucial for ensuring that the hooks, racks, or pulley systems are securely anchored to a structurally sound part of the garage framework. Avoid attaching these components to drywall alone, as it will not provide sufficient support.
Step 2: Measure and Plan Spacing: Determine the desired spacing between bikes, considering handlebar width and pedal clearance. Measure and mark the locations for each hook, rack, or pulley system component. Ensure that the bikes will be positioned to avoid interference with garage doors, vehicles, or other stored items. Consider the height at which the bikes will be hung, accounting for ceiling height and accessibility. For pulley systems, ensure sufficient vertical clearance for lifting and lowering the bikes.
Step 3: Drill Pilot Holes: Using a drill with an appropriately sized drill bit, pre-drill pilot holes at the marked locations. This will make it easier to insert the screws or bolts and prevent the wood from splitting. The drill bit size should be slightly smaller than the diameter of the screws or bolts being used.
Step 4: Install Hooks, Racks, or Pulley Systems: Attach the hooks, racks, or pulley system components to the studs or joists using the appropriate screws or bolts. Ensure that they are securely fastened and properly aligned. For hooks, screw them in until they are firmly seated and cannot be easily pulled out. For racks and pulley systems, use a level to ensure that they are mounted straight and plumb. Tighten all bolts and screws securely, but avoid over-tightening, which could damage the surrounding wood or hardware.
Step 5: Test the Installation: Before hanging the bikes, test the installation by applying downward pressure to the hooks, racks, or pulley systems. This will help verify that they are securely attached and can support the weight of the bikes. If any movement or instability is detected, re-tighten the screws or bolts or adjust the mounting position as necessary.
Step 6: Hang the Bikes: Carefully lift the bikes and hang them on the installed hooks, racks, or pulley systems. Ensure that they are properly balanced and securely supported. For ceiling-mounted hooks, hang the bikes by the front or rear wheel. For wall-mounted racks, place the bike frame on the padded arms. For pulley systems, attach the hooks to the handlebars and seat and use the pulley mechanism to lift the bikes to the desired height.
Safety Precautions and Considerations
Prioritizing safety during the installation process is paramount. Ignoring safety guidelines can lead to personal injury or damage to the garage structure. The following precautions should be observed:
Eye Protection: Always wear safety glasses to protect the eyes from dust, debris, and flying particles generated during drilling and fastening.
Ladder Safety: If using a ladder, ensure that it is placed on a stable and level surface. Avoid overreaching and maintain three points of contact with the ladder at all times. Have someone spot the ladder to prevent it from tipping.
Electrical Hazards: Be aware of the location of electrical wiring and plumbing within the garage walls and ceiling. Avoid drilling or fastening in areas where these utilities are present. If unsure, consult a qualified electrician or plumber.
Weight Limits: Ensure that the chosen hanging method and hardware are rated to support the weight of the bikes. Exceeding weight limits can lead to failure of the system and potential damage or injury.
Regular Inspection: Periodically inspect the hooks, racks, pulley systems, and hardware for signs of wear, damage, or looseness. Tighten any loose screws or bolts and replace any damaged components promptly.
Bike Maintenance: Before hanging bikes, ensure that tires are properly inflated. This prevents flat spots and makes bikes easier to handle when removing them from the hanging system. Grease chains and other moving parts regularly to prevent rust and ensure smooth operation.
By adhering to these safety precautions and carefully following the installation instructions, homeowners can effectively hang their bikes in the garage, creating a more organized and functional space. A well-executed DIY bike storage solution not only saves space but also protects the bikes from damage and makes them readily accessible for future use.

Diy Bike Rack For 20 Storage Stand Cabinet Garage 5 Steps With Pictures Instructables

Diy Bike Rack For 20 Storage Stand Cabinet Garage Crafted Work

Easy And Diy Bike Rack House Becoming Home

Creative Diy Bike Storage Racks Ohmeohmy Blog

Building A Compact Bike Rack For 6 Bikes In 60 Seconds

Diy Simple Bike Rack In The Garage For

10 Smart Diy Bike Rack Ideas For Your Garage The Handyman S Daughter

13 Garage Bike Storage Ideas

10 Smart Diy Bike Rack Ideas For Your Garage The Handyman S Daughter

Diy Bike Storage Rack
Related Posts