How To Build Garage Ceiling Shelves Out Of Wood Frames in Singapore
Garage space in Singapore, especially within HDB (Housing Development Board) estates or smaller landed properties, is often a premium. Optimizing vertical space by building garage ceiling shelves offers a practical solution for storing less frequently used items, freeing up valuable floor area. Constructing these shelves using wood frames provides a cost-effective and customizable storage solution suitable for various garage layouts. This article will detail the process of building sturdy and functional garage ceiling shelves using wood frames, specifically tailored to the Singaporean context, considering the materials readily available and the common structural considerations.
Before embarking on the project, careful planning and adherence to safety regulations are paramount. It is crucial to assess the garage's ceiling structure to ensure it can safely support the weight of the shelves and the items they will hold. In Singapore, HDB garages often have concrete ceilings, while those in landed properties may have timber or metal framing. The method of attachment and the weight distribution will differ based on the ceiling type.
The load-bearing capacity of the ceiling structure needs to be determined. Consulting with a structural engineer or experienced contractor is recommended, especially for older buildings or if there are any doubts about the ceiling's strength. Overloading the ceiling could lead to structural damage and potential safety hazards.
Materials needed include wood for framing (typically kiln-dried pine or pressure-treated wood, readily available at hardware stores in Singapore), screws, wood glue, measuring tape, level, drill, safety glasses, and a ladder. The dimensions and quantity of wood required will depend on the desired size and configuration of the shelves. Always prioritize safety when working at height; ensure the ladder is stable and appropriate safety gear is worn.
Planning and Design Considerations
Effective planning is the cornerstone of a successful garage shelving project. The initial step involves measuring the available space above the garage, accounting for any obstructions such as lighting fixtures, pipes, or garage door mechanisms. Accurate measurements will inform the dimensions of the shelves and ensure a proper fit within the garage structure.
Consider the items to be stored on the shelves. This will determine the depth and height of the shelves, as well as the spacing between them. Heavier items will require stronger framing and more secure attachment points to the ceiling. Plan for adequate headroom to avoid accidental bumps or collisions with the shelves.
Choosing the appropriate wood is crucial. In Singapore's humid climate, kiln-dried pine is a good option for indoor use as it is less prone to warping. For garages with higher humidity or potential water exposure, pressure-treated wood is recommended. The wood should be straight, free of knots, and of sufficient thickness to support the intended load. Commonly used wood sizes include 2x4 inches (50mm x 100mm) for the frame and 1x4 inches (25mm x 100mm) for shelf supports.
Design the shelves with sufficient structural support. This can be achieved by incorporating cross-bracing or gussets into the frame. Cross-bracing, typically installed diagonally, adds rigidity to the structure and prevents racking. Gussets, which are triangular pieces of wood attached to the corners, reinforce the joints and increase load-bearing capacity. The placement and spacing of these supports should be carefully considered based on the size and weight of the items to be stored.
Drawing a detailed plan or sketch of the shelf design, including all measurements and support placements, is highly recommended. This will serve as a blueprint during the construction process and help avoid mistakes. Take into account the hardware needed for secure attachment to the ceiling, and confirm their availability in local Singaporean hardware stores. Consider using readily available fasteners and anchors designed for concrete or timber ceilings depending on the garage construction.
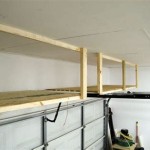
Construction Process
The construction process begins with cutting the wood according to the planned dimensions. Accuracy is essential to ensure a proper fit and structural integrity. Use a saw (circular saw, miter saw, or hand saw) to make clean and precise cuts. Always wear safety glasses and follow proper safety procedures when using power tools.
Assemble the wood frame using screws and wood glue. Pre-drilling pilot holes is recommended to prevent the wood from splitting, especially when working with hardwoods or near the edges. Apply wood glue to the joints before screwing them together for added strength. Ensure the frame is square and level throughout the assembly process. A carpenter's square and level will be invaluable tools for this task.
Attach the cross-bracing or gussets to the frame. These supports will add stability and prevent the shelves from sagging under weight. The cross-bracing should be securely fastened to the frame with screws and wood glue. Gussets can be attached using screws, nails, or a combination of both. Ensure the supports are evenly spaced and properly aligned to provide uniform load distribution.
Install the shelf supports. These supports will hold the shelves themselves and should be spaced close enough to prevent the shelves from bowing or bending. The spacing will depend on the thickness of the shelf material and the weight of the items to be stored. Secure the supports to the frame with screws and wood glue. Verify the supports are level to ensure the shelves will sit evenly.
Construct the shelves from plywood, oriented strand board (OSB), or solid wood. Plywood is a popular choice for its strength, stability, and affordability. OSB is a more economical option but may be less durable in humid environments. Solid wood is the most expensive option but offers superior strength and aesthetics. Cut the shelves to the desired size and shape, and ensure they fit snugly within the frame. Fasten the shelves to the supports with screws. Consider adding a lip or edging to the shelves to prevent items from sliding off.
Installation and Securing to the Ceiling
The most critical step in building garage ceiling shelves is the secure attachment of the frame to the ceiling. The method of attachment will depend on the type of ceiling (concrete, timber, or metal) and the weight of the shelves and their contents. In Singapore, concrete ceilings are common in HDB garages, requiring the use of appropriate concrete anchors.
For concrete ceilings, use concrete screws or expansion anchors to attach the frame to the ceiling. Drill pilot holes into the concrete at the marked locations, using a hammer drill with a masonry bit. The size of the pilot holes should match the specifications of the chosen anchors. Insert the anchors into the pilot holes and tighten them securely. Ensure the anchors are rated for the weight they will be supporting. Consult with a hardware professional to select the appropriate anchors for the specific load requirements.
For timber ceilings, use lag screws to attach the frame to the ceiling joists. Locate the ceiling joists using a stud finder. Drill pilot holes through the frame and into the joists, and then drive in the lag screws. Ensure the lag screws are long enough to penetrate deeply into the joists for a secure hold. If the joists are not spaced appropriately, consider adding additional blocking between the joists to provide additional attachment points.
For metal ceilings, use self-tapping screws or metal anchors to attach the frame to the ceiling studs. Locate the metal studs using a stud finder. Drill pilot holes through the frame and into the studs, and then drive in the self-tapping screws. If the studs are not strong enough to support the weight of the shelves, consider using metal anchors that distribute the load over a larger area. Prior to installation, verify the load bearing capacity of the selected screws and anchors meets the safety requirements.
When attaching the frame to the ceiling, ensure it is level and plumb. Use a level to check the alignment and make any necessary adjustments before fully tightening the screws or anchors. Uneven shelves can be difficult to access and may not be able to support the weight of the items safely. Take your time and double-check your work to ensure a secure and level installation.
Once the frame is securely attached to the ceiling, install the shelves. Place the shelves onto the supports and fasten them with screws. Make sure the shelves are flush with the frame and level. Check the load-bearing capacity of the shelves by placing a representative weight on them. If the shelves sag or bend, add additional supports or reinforce the frame. Ensure the shelves are adequately illuminated for easy access and visibility. Consider installing LED strip lights or other lighting solutions to enhance the functionality of the storage space.

Diy Garage Shelves Plans Easy Neat And Functional

3x8 Above Head Garage Storage Easy Install Organization Yourboard

Diy Garage Shelves Plans Easy Neat And Functional

2x4 Garage Shelf Build Plans And Cut List Easy To Home Shed Storage Inexpensive Diy Plastic Tote Organization

Garage Shelves With Work Bench Diy Shelf Storage Organization Plans

Garage Shelves With Work Bench Diy Shelf Storage Organization Plans

Ultimate Guide To Storage Racks For Garage Gear Yourboard

How To Lumber In Your Woodworking

Levrack Mobile Aisle Storage System Enters The Consumer Market

4 X 8 Faber Overhead Garage Shelving Holds 700 Lbs Yourboard
Related Posts