How To Build Garage Ceiling Shelves Out Of Wood
Garages often become repositories for items that lack a designated place within the home. This accumulation can rapidly deplete valuable floor space, impeding vehicle parking and project execution. Constructing ceiling-mounted shelves offers an effective strategy for reclaiming this space by utilizing the often-underutilized vertical area. Building garage ceiling shelves out of wood provides a customizable and cost-effective storage solution.
Before commencing construction, a thorough assessment of garage specifications is paramount. This includes evaluating ceiling height, joist spacing, and weight-bearing capacity. Existing obstructions, such as garage door tracks and lighting fixtures, must be accounted for to ensure shelf placement minimizes interference. Consider the type of items to be stored on the shelves. Understanding the weight and dimensions of these items will significantly impact the shelf design and construction materials.
Safety considerations should be at the forefront throughout the building process. Wear appropriate personal protective equipment (PPE), including safety glasses, gloves, and a dust mask. When working at heights, utilize a stable ladder or scaffolding and exercise caution to prevent falls. Ensure the garage is well-ventilated, especially when using power tools. Prioritize securing the shelves properly to the ceiling joists to prevent collapse and potential injury.
Planning and Design
The design phase involves determining the dimensions, configuration, and load-bearing requirements of the shelves. Initially, measure the available space between ceiling joists. Standard joist spacing is typically 16 or 24 inches on center, but variations may exist. The shelf depth and length will be dictated by the storage needs and the available space. A deeper shelf offers more storage capacity but may obstruct overhead space. The shelf length is limited by the joist spacing unless additional support is incorporated.
Consider the desired shelf height. Adequate clearance must be maintained to allow for easy access to items without bumping into the shelving. A minimum clearance of 12 inches is generally recommended, but this may vary depending on the height of the individuals who will be accessing the shelves. Sketching a detailed plan, including dimensions and material specifications, is highly recommended. This visual representation aids in material procurement and ensures accurate construction.
Determine the load capacity required for the shelves. Heavier items necessitate stronger materials and more robust support. Calculate the estimated weight of the items to be stored and factor in a safety margin. It is prudent to overestimate the weight rather than underestimate it. The load capacity dictates the type and size of lumber used for the framing and shelving surfaces. Consult load-bearing charts for specific wood species and dimensions to ensure structural integrity.
Choose lumber that is appropriate for garage conditions. Pressure-treated lumber is resistant to moisture and insect damage, making it suitable for damp or humid environments. However, pressure-treated lumber can be more expensive and heavier. Untreated lumber can be used if the garage is well-ventilated and dry. Kiln-dried lumber minimizes warping and twisting, ensuring a more stable and reliable shelf structure. Select lumber that is straight, free from knots, and of uniform thickness.
Materials and Tools
A comprehensive materials list is essential for efficient construction. Standard materials include lumber for the framing and shelving surfaces, screws or lag bolts for securing the shelves to the ceiling joists, and wood screws for assembling the shelving components. Consider using construction adhesive to reinforce joints and increase the overall strength of the structure. Additional materials may include metal brackets or straps for added support, paint or sealant for protecting the wood, and safety glasses, gloves, and a dust mask for personal safety.
The necessary tools include a measuring tape, level, stud finder, drill, screwdriver, saw (circular saw or hand saw), hammer, and safety glasses. A stud finder is crucial for accurately locating ceiling joists. A drill is used for pre-drilling holes and driving screws. A level ensures that the shelves are installed horizontally. A saw is used for cutting the lumber to the required dimensions. A hammer may be needed for driving nails, although screws are generally preferred for their superior holding power.
Consider using a power drill with a countersinking bit. Countersinking the screw heads allows them to sit flush with the surface of the wood, preventing them from snagging on items stored on the shelves. A power screwdriver streamlines the assembly process, making it faster and more efficient. A circular saw provides precise and clean cuts, but a hand saw can be used for smaller cuts or when a power saw is not available. A ladder or scaffolding is essential for safely accessing the ceiling area.
Construction Process
The initial step involves accurately locating the ceiling joists using a stud finder. Mark the location of each joist on the ceiling. These marks will serve as guides for attaching the shelf supports. Consider using a chalk line to create straight lines across the ceiling, ensuring that the shelves are installed parallel and evenly spaced. This careful marking contributes to a professional and aesthetically pleasing result.
Cut the lumber for the shelf supports to the required length. The length of the supports will determine the depth of the shelves. Assemble the shelf supports using wood screws and construction adhesive. Ensure that the supports are square and properly aligned. Reinforce the joints with metal brackets or straps for added stability. These supports will bear the weight of the shelves and the items stored on them, so their structural integrity is paramount.
Attach the shelf supports to the ceiling joists using lag bolts or screws. Pre-drill pilot holes through the supports and into the joists. This prevents the wood from splitting and ensures a secure connection. Use lag bolts for heavier loads and screws for lighter loads. Ensure that the fasteners penetrate deeply into the joists to provide maximum holding power. Space the supports evenly along the joists to distribute the weight uniformly.
Cut the lumber for the shelving surfaces to the required dimensions. The dimensions of the shelving surfaces will be determined by the shelf depth and length. Attach the shelving surfaces to the shelf supports using wood screws. Ensure that the screws are evenly spaced and driven flush with the surface of the wood. Consider using construction adhesive to bond the shelving surfaces to the supports for added strength.
Consider adding a lip or edge to the shelves to prevent items from falling off. This can be accomplished by attaching a strip of wood along the front edge of the shelves. The lip should be tall enough to contain the items stored on the shelves but not so tall as to obstruct access. Secure the lip to the shelving surface using wood screws and construction adhesive.
Inspect the completed shelves thoroughly to ensure that they are securely attached to the ceiling joists and that all screws are properly tightened. Test the shelves by placing a moderate amount of weight on them. Observe the shelves for any signs of sagging or instability. If any issues are detected, reinforce the shelves with additional supports or fasteners.
Apply a coat of paint or sealant to protect the wood from moisture and insect damage. This is especially important if the garage is damp or humid. Choose a paint or sealant that is specifically designed for exterior use. Apply the paint or sealant according to the manufacturer's instructions. Allow the paint or sealant to dry completely before storing any items on the shelves.

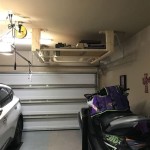
Diy Garage Ceiling Storage Shelves

Diy How To Build Suspended Garage Shelves Building Strong

Diy How To Build Suspended Garage Shelves Building Strong

Diy Garage Ceiling Storage Shelves

Diy Garage Ceiling Storage And Wall Organization Angela Marie Made

How To Build Diy Garage Storage Shelves Crafted Work

How To Build Diy Garage Storage Shelves Crafted Work

How To Diy A Ceiling Garage Storage System The Family Handyman

Adding Storage Above The Garage Door Jays Custom Creations

How To Build Diy Garage Shelving Young House Love
Related Posts