How To Build A Suspended Shelf In a Garage
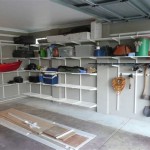
Suspended shelving offers an excellent solution for maximizing storage space in a garage, particularly when floor space is at a premium. This design keeps items off the floor, protecting them from moisture and pests while creating a tidy, organized environment. This article provides a comprehensive guide to constructing a robust and practical suspended shelf.
Planning and Preparation
Before commencing construction, careful planning is essential. Begin by assessing the available space and determining the desired shelf dimensions. Consider the weight and type of items the shelf will hold to ensure adequate load-bearing capacity. Measure the area meticulously, noting the location of ceiling joists or rafters. These structural members will provide the anchoring points for the suspension system.
Material Selection
Choosing the right materials is crucial for a safe and durable suspended shelf. For the shelf frame, sturdy lumber such as 2x4s or 2x6s is recommended. Plywood, particleboard, or OSB (Oriented Strand Board) can serve as the shelf surface, with thicker materials offering greater load capacity. Threaded rods, commonly available in various diameters, provide the suspension mechanism. Select a diameter appropriate for the anticipated load. Other necessary materials include washers, nuts, lag screws, wood screws, and a suitable wood finish or sealant (optional).
Tools Required
Gathering the necessary tools beforehand ensures a smooth construction process. Essential tools include a drill with appropriate drill bits for both wood and metal, a stud finder, a measuring tape, a level, a saw (circular saw or handsaw), safety glasses, and work gloves. A wrench or socket set is needed for tightening the nuts on the threaded rods. A ladder or step stool will also be required for accessing the ceiling.
Construction Steps
Step 1: Locate Ceiling Joists
Use a stud finder to locate the ceiling joists within the designated shelf area. Mark the joist locations clearly. Ensure that the chosen joists are strong enough to support the intended load. If there is any doubt, consult a structural engineer.
Step 2: Construct the Shelf Frame
Cut the lumber to the desired dimensions for the shelf frame. Assemble the frame using wood screws, ensuring square corners. Reinforce the frame with additional bracing if necessary, especially for larger shelves or heavier loads.
Step 3: Prepare the Suspension Rods
Measure and cut the threaded rods to the required length. The length should allow for the desired shelf height, plus enough length to pass through the ceiling joists and secure with washers and nuts. Thread a nut and washer onto each end of each rod.
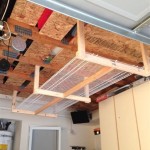
Step 4: Install the Suspension Rods
Drill pilot holes through the ceiling joists at the marked locations. The pilot holes should be slightly smaller than the diameter of the threaded rods. Insert the threaded rods through the holes, ensuring the nut and washer remain on the top side. Secure the rods by threading another washer and nut onto the bottom end, tightening them securely against the joist.
Step 5: Attach the Shelf Frame to the Rods
Position the shelf frame beneath the hanging rods. Drill pilot holes through the frame and into the wood directly below each rod. Use lag screws to securely fasten the frame to the rods. Ensure that the shelf is level throughout the process.
Step 6: Install the Shelf Surface
Cut the shelf surface material to the appropriate dimensions. Secure it to the frame using wood screws, ensuring even spacing and countersinking the screws to prevent protrusion.
Step 7: Finishing Touches
Once the shelf is assembled, inspect all connections and tighten any loose nuts or screws. Apply a wood finish or sealant to protect the wood and enhance its appearance, if desired. This step is particularly important in a garage environment, where temperature and humidity fluctuations can affect the wood.
Safety Considerations
Always prioritize safety during construction. Wear appropriate safety gear, including safety glasses and work gloves. Use caution when working at heights and ensure the ladder or step stool is stable. Double-check all measurements and connections to ensure the shelf's stability and load-bearing capacity. Consult local building codes and regulations before commencing any construction project.
Load Capacity and Maintenance
Regularly inspect the shelf for any signs of wear or damage. Tighten loose hardware as needed. Be mindful of the shelf's load capacity and avoid overloading it. Distribute weight evenly across the shelf surface to prevent stress concentration. Overloading can lead to structural failure and potential injury.

Diy How To Build Suspended Garage Shelves Building Strong

Diy How To Build Suspended Garage Shelves Building Strong

Diy Garage Shelves 5 Ways To Build Yours Bob Vila

How To Create Garage Storage With Ceiling Mounted Shelves Diy Wall Shelving Overhead

Diy How To Build Suspended Garage Shelves Building Strong

3 Ways To Build Garage Shelving Wikihow

Diy How To Build Suspended Garage Shelves Building Strong

Garage Makeover With Diy Shelving Frills And Drills

Threaded Rod Garage Shelf Woodworkstorage Diy Overhead Storage Shelves

Diy Garage Storage Shelves
Related Posts