How To Build A Concrete Block Garage
Building a concrete block garage offers a durable, secure, and cost-effective storage solution. This guide provides a comprehensive overview of the construction process, from initial planning to final touches. While this guide provides a general overview, consulting local building codes and seeking professional advice for specific aspects of the project is essential.
Planning and Preparation: The initial stage involves careful planning and preparation. Begin by determining the desired size and location of the garage. Check local zoning ordinances and building codes for specific regulations regarding setbacks, height restrictions, and permitted materials. A detailed plan should include accurate measurements, door and window placements, and the layout of any electrical or plumbing fixtures.
Foundation Construction: A solid, level foundation is crucial for the structural integrity of the garage. The foundation type will depend on the soil conditions and local building codes. Common options include a poured concrete slab or a concrete footing with a stem wall. Accurate excavation and proper compaction of the base material are essential for a stable foundation. Once the excavation is complete, install formwork to define the foundation's shape and pour the concrete, ensuring it is properly leveled and cured.
Wall Construction: Concrete blocks are laid in a staggered pattern, similar to bricklaying, using a mortar mix. The first course of blocks is critical for establishing a level and straight wall. Use a string line as a guide and ensure each block is level and plumb. Mortar joints should be consistent in thickness and properly tooled for a clean, professional appearance. Reinforcing the walls with steel rebar at regular intervals, as specified by local building codes, enhances structural strength. Install lintel blocks or steel lintels above door and window openings to support the load from the blocks above.
Roof Framing and Installation: Once the walls reach the desired height, the next step is framing the roof. Common roof types for garages include gable, shed, and hip roofs. The choice depends on aesthetic preferences, budget, and local climate conditions. Construct the roof trusses or rafters using lumber of appropriate dimensions according to the design specifications. Sheathe the roof with plywood or OSB (Oriented Strand Board) to provide a nailing surface for the roofing material.
Roofing Material Installation: Select a durable and weather-resistant roofing material such as asphalt shingles, metal roofing, or tile. Install the chosen roofing material according to the manufacturer’s instructions. Ensure proper overlapping and sealing to prevent leaks. Install flashing around chimneys, vents, and any other roof penetrations to ensure a watertight seal.
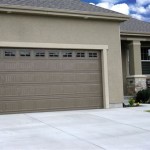
Door and Window Installation: After the roof is complete, install the garage door and any windows. Garage doors come in various styles and materials, including roll-up, sectional, and swing-up doors. Choose a door that suits the garage’s design and provides adequate security. Follow the manufacturer’s instructions for proper installation. Install windows according to the manufacturer's recommendations, ensuring proper sealing and insulation.
Electrical and Plumbing: If the garage requires electrical wiring or plumbing, it is recommended to consult with licensed professionals. Electrical work may include installing outlets, lighting fixtures, and wiring for garage door openers. Plumbing work may involve installing a water supply line and drain for a utility sink or other fixtures. Ensure all electrical and plumbing work adheres to local building codes and safety regulations.
Finishing Touches: The final stages involve completing the interior and exterior finishes. Interior finishes may include painting the walls, installing insulation, and adding storage solutions such as shelving or cabinets. Exterior finishes may include painting or staining the concrete blocks, adding siding, or landscaping around the garage perimeter. These finishing touches enhance the appearance and functionality of the garage.
Concrete Curing and Sealant: Allow sufficient time for the concrete to cure properly. Applying a concrete sealant after the curing period helps protect the concrete from moisture, staining, and freeze-thaw damage. Choose a sealant appropriate for the specific type of concrete and the local climate conditions. Follow the manufacturer's instructions for application and drying time.
Site Cleanup: Once the construction is complete, thoroughly clean the site, removing any debris, leftover materials, and construction waste. Proper disposal of construction waste is essential for environmental responsibility and compliance with local regulations.
Building a concrete block garage requires careful planning, accurate execution, and adherence to building codes. While this guide provides a general overview, specific project requirements may vary depending on location, design, and individual preferences. Consulting with local building officials and seeking professional advice when needed ensures a successful and compliant construction project.

How To Build A Garage Work Part 1

Block Garage Foundation

Garage Build Ideas Mig Welding Forum

Beardmore Bros Tig Welding

Pin By Clarity Real Estate On New House Ideas Garage Plans Cinder Block Construction

Build An Off Grid Bunkhouse Garage Cellar Backwoods Home

Block Garage Foundation

Rv Garage Plans With Concrete Block Walls 062g 0089 At Www Thegarageplan Com

Rv Garage Plans With Concrete Block Walls 062g 0089 At Www Thegarageplan Com

How To Build A Concrete Block Foundation Blocks Building Garage
Related Posts