Homemade Bike Rack for Garage Door Opener: A Practical Guide
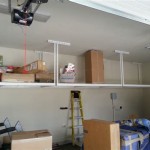
Efficient storage is a common challenge for homeowners, especially those with limited space. Bicycles, while offering numerous health and environmental benefits, often contribute to clutter, particularly within the garage. Utilizing the space above a garage door, typically unused when the door is open, presents a viable solution for bike storage. This article details the construction of a homemade bike rack designed to attach to a garage door opener, offering a space-saving and easily accessible storage solution.
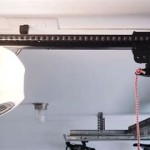
The concept leverages the structural support provided by the garage door opener system itself, rather than relying on wall mounting, which can be problematic depending on wall material and available space. By suspending bikes from a rack attached to the opener, the floor space remains clear, and the bikes are readily available for use. The design considerations, materials, and construction steps are outlined below, providing a comprehensive guide for those seeking a practical and cost-effective bike storage solution.
Key Point 1: Design Considerations and Safety
Before embarking on the construction of a homemade bike rack, careful consideration must be given to several critical factors. Safety is paramount, and the design must ensure the secure and stable support of the bicycles without compromising the functionality or safety of the garage door opener system. Load capacity, compatibility with the specific garage door opener model, and ease of use are all essential design considerations.
The weight of the bicycles, combined with the weight of the rack itself, must be within the load limits specified by the garage door opener manufacturer. Exceeding these limits can lead to premature wear and tear or even failure of the opener mechanism. Consult the opener's manual and relevant safety guidelines to determine the permissible weight capacity. If the combined weight approaches or exceeds the limit, consider alternative storage solutions or consult a professional engineer for design modifications.
Compatibility with the garage door opener model is another crucial aspect. Different openers have varying mounting points and structural components. The rack design must be adapted to the specific model to ensure secure attachment and proper weight distribution. A universal design is unlikely to be suitable for all openers, requiring a customized approach for each installation. Research the opener’s construction and available mounting points to determine the most appropriate attachment method.
Ease of use is essential for the long-term viability of the bike rack. The rack should allow for easy loading and unloading of bikes, ideally without requiring significant lifting or maneuvering. Consider the height of the rack and the user's reach when designing the lifting mechanism. A well-designed rack will encourage consistent use, preventing the bikes from simply being left on the floor.
Safety features should be incorporated into the design to prevent accidental release of the bikes or interference with the garage door operation. These features may include locking mechanisms, safety straps, and clear markings indicating the proper loading and unloading procedures. Regular inspection of the rack and attachment points is also crucial to ensure the continued safety and stability of the system.
Furthermore, ensure that the bike rack design does not obstruct the safety sensors of the garage door opener. These sensors are designed to prevent the door from closing if an obstruction is detected. If the rack or the bikes interfere with the sensor beam, the garage door may not function correctly, posing a safety hazard. Thoroughly test the functionality of the safety sensors after installing the bike rack to ensure they remain operational.
Key Point 2: Materials and Tools
The selection of appropriate materials is critical to the strength, durability, and safety of the homemade bike rack. Steel is generally the preferred material for the main structural components due to its high strength-to-weight ratio and weldability. However, aluminum can be used for lighter components if weight is a primary concern, provided that it is properly reinforced. Wood is generally not recommended for structural components due to its lower strength and susceptibility to moisture damage, but it can be used for non-load-bearing elements such as padding or protective covers.
For the main support structure, consider using steel tubing or angle iron. The thickness of the steel will depend on the weight of the bikes and the overall design of the rack. Consult with a metal supplier or structural engineer to determine the appropriate gauge of steel for the intended load. Ensure that the steel is free from rust and corrosion, and apply a protective coating such as paint or powder coating to prevent future corrosion.
The choice of fasteners is equally important. Use high-strength bolts, nuts, and washers to securely attach the rack to the garage door opener. Avoid using self-tapping screws or rivets, as these may not provide sufficient holding power. Consider using locking washers or thread-locking compound to prevent the fasteners from loosening over time due to vibration. Ensure that the fasteners are compatible with the materials being joined to prevent galvanic corrosion.
In addition to the structural materials and fasteners, other materials may be needed for padding, protection, and aesthetics. Foam padding can be used to protect the bikes from scratches and dings. Rubber or plastic caps can be used to cover sharp edges and prevent injuries. Paint or powder coating can be used to give the rack a professional finish and protect it from corrosion.
The following tools will be necessary for constructing the bike rack: a measuring tape, a marker, a saw (metal cutting saw or angle grinder), a drill with various drill bits, a welder (if using steel), a wrench and socket set, a level, and safety glasses. A vise or clamps will also be helpful for holding the materials in place during cutting and welding.
Safety is paramount when working with tools and materials. Always wear safety glasses to protect your eyes from flying debris. Wear gloves to protect your hands from sharp edges and chemicals. Use a respirator when welding or painting to avoid inhaling harmful fumes. Work in a well-ventilated area to prevent the buildup of toxic gases. Never attempt to operate tools that you are not familiar with. If you are unsure about any aspect of the construction process, seek assistance from a qualified professional.
Key Point 3: Construction Steps and Installation
The construction of the bike rack involves several steps, beginning with precise measurements and cutting of the materials. Start by measuring the width of the garage door and the distance between the mounting points on the garage door opener. Based on these measurements, cut the steel tubing or angle iron to the appropriate lengths for the main support structure. Ensure that the cuts are clean and square to prevent misalignment during assembly.
Next, drill holes in the steel tubing or angle iron for the attachment points. Use a drill press or a steady hand to ensure that the holes are accurately positioned. Deburr the edges of the holes to prevent chafing or cutting of the fasteners. Test fit the components to ensure that they align properly before proceeding to the next step.
If using steel, weld the components together to form the main support structure. Ensure that the welds are strong and complete, and that there are no gaps or voids. Grind down any rough edges or weld spatter to create a smooth surface. If you are not comfortable with welding, consider using bolted connections instead. However, bolted connections may not be as strong or durable as welded connections.
After the main support structure is assembled, add any additional features such as hooks, loops, or brackets for holding the bikes. These features can be welded or bolted to the main support structure, depending on their design and the materials used. Ensure that the hooks or loops are properly sized to accommodate the bikes and that they are securely attached to the rack.
Once the rack is fully assembled, clean it thoroughly and apply a protective coating such as paint or powder coating. This will prevent corrosion and give the rack a professional finish. Allow the paint or powder coating to dry completely before installing the rack. Apply padding to any areas that may come into contact with the bikes to prevent scratches or dings.
The installation process involves attaching the rack to the garage door opener. Carefully position the rack and align it with the mounting points on the opener. Use high-strength bolts, nuts, and washers to securely attach the rack to the opener. Tighten the fasteners gradually and evenly to prevent distortion of the rack or the opener. Double-check that all fasteners are securely tightened before proceeding.
After the rack is installed, test its functionality by loading and unloading the bikes. Ensure that the bikes are securely supported and that the rack does not interfere with the operation of the garage door. Check the safety sensors to ensure that they are still functioning correctly. If any adjustments are needed, make them carefully and retest the system. Regularly inspect the rack and attachment points to ensure that they remain secure and in good condition. Address any issues promptly to prevent accidents or damage.
Consider consulting with a qualified professional or engineer for assistance with the design, construction, and installation of the bike rack, especially if you are not experienced with metalworking or structural engineering. A professional can help you ensure that the rack is safe, durable, and compatible with your garage door opener.

Easy And Diy Bike Rack House Becoming Home

14 Garage Bike Storage Ideas For Your Space

Bike Rack Storage For The Home Or Apartment 8 Steps With Pictures Instructables

How To Bikes In Your Garage The Ultimate Guide

Diy Bike Rack For 20 Storage Stand Cabinet Garage 5 Steps With Pictures Instructables

Diy Bike Rack For 20 Storage Stand Cabinet Garage 5 Steps With Pictures Instructables

14 Garage Bike Storage Ideas For Your Space

14 Garage Bike Storage Ideas For Your Space

Saving Floor Space With A Scratch Built Bike Hoist Aday

How To Build A Swing Down Bicycle Storage Lift Free Plans
Related Posts