Garage Door Sensor Installation: A Comprehensive Guide for Enhanced Security
Garage door sensors are essential components of modern home security systems, offering an additional layer of protection against unauthorized entry. Installing these devices requires meticulous attention to detail and a thorough understanding of their functionality. Here's a comprehensive guide to help you achieve a successful garage door sensor installation:
1. Gather Necessary Tools and Materials
Before commencing the installation process, ensure you have the following tools and materials:
- Garage door sensor kit (transmitter and receiver)
- Screwdriver
- Drill
- Measuring tape
- Pencil or marker
- Level
- Electrical tape
- Ladder
2. Determine Sensor Placement
The optimal placement for the garage door sensors is crucial for their effective operation. The transmitter should be mounted on the door frame, directly in line with the receiver. The receiver should be positioned on the door, a few inches above the ground, ensuring the transmitter's beam remains uninterrupted.
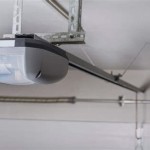
3. Install Transmitter
Using the screws provided in the kit, mount the transmitter on the door frame. Ensure the sensor's beam is pointing towards the receiver's location. Use a level to ensure the transmitter is installed straight.
4. Install Receiver
Follow the same steps as the transmitter to mount the receiver on the door, approximately 6 to 8 inches above the ground. Adjust the receiver's position until the transmitter's beam falls directly on the receiver's lens.
5. Connect Wires
Most garage door sensor kits come with pre-wired cables. Connect the wires to the terminals on both the transmitter and receiver, following the manufacturer's instructions. Ensure secure connections and use electrical tape to insulate the exposed wires.
6. Test the Sensors
Once the sensors are installed and connected, test their functionality. Open and close the garage door several times, observing the LED lights on the sensors. The LED should illuminate when the door is closed, indicating the beam is not interrupted. When the door is open, the LED should turn off.
7. Final Adjustments
If the sensors are not working as intended, perform the following adjustments:
- Realign the sensors to ensure the beam is not blocked.
- Check the wiring connections for any loose or damaged wires.
- Clean the sensors' lenses with a soft cloth.
- Replace the batteries in the transmitter (if applicable).
Conclusion
By following these steps carefully, you can successfully install garage door sensors and enhance the security of your home. Remember to regularly maintain and inspect the sensors to ensure their continuous functionality. With proper installation and maintenance, these sensors will provide you with peace of mind, knowing that your garage door is protected against intruders and accidental openings.

Diy Garage Door Sensor Techcrunch

13 Effective Method To Bypass Garage Door Sensors Camco Doors Of Gatlinburg

Garagemax Bluemate Labs Inc

How To Tell If Your Garage Door Sensor Isn T Working Common Signs Causes Of Problems

Garage Door Sensor Repair Precision Doors Las Vegas

Garage Door Safety Sensor Installation Hostetler Askew

Liftmaster Wiring Garage Door Sensor Wires Opener Check More At Https Myhot Pw Chamberlain Doors

Mimolite Garage Door Closes From App But Not On Connected Things Smartthings Community

I Need To Rewire The Safty Reverse Sensors On My Garage Door Opener Wires That Come Out Of Wall Are 1 Orange

Installing Sense Contact Sensor To Garage Door Tips Tricks Wyze Forum
Related Posts