Craftsman Garage Door Opener Troubleshooting: Decoding the 10 Flashes
A flashing light on a Craftsman garage door opener is a diagnostic indicator, signaling a problem within the system. When the light flashes ten times, it corresponds to a specific issue that requires troubleshooting. Understanding the cause behind the ten flashes is crucial for effective repair and restoration of normal garage door operation. This article will delve into the potential reasons for this error code and provide step-by-step guidance on how to diagnose and resolve the problem.
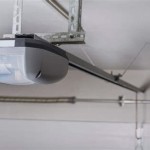
The Craftsman garage door opener, like many modern models, employs a safety system using photoelectric sensors, often referred to as safety eyes, installed near the bottom of the door tracks. These sensors project an invisible beam across the doorway. If this beam is interrupted while the door is closing, the opener reverses the door's direction, preventing potential injury or damage. The ten-flash error code is almost universally associated with a problem involving these safety sensors.
Ignoring this issue is not advisable. A malfunctioning garage door opener poses a security risk, allowing unauthorized access to the garage and potentially the home. Furthermore, continuously attempting to operate the door with a known sensor issue can lead to further strain on the motor and other components, potentially resulting in more costly repairs in the future. Therefore, prompt diagnosis and rectification of the ten-flash error are essential for safety, security, and the longevity of the garage door opener system.
Understanding the Safety Sensor System
The safety sensor system consists of two units: the sending sensor, which emits an infrared light beam, and the receiving sensor, which detects the beam. Both sensors need to be properly aligned and free from obstructions to function correctly. Power is supplied to each sensor, typically 5V DC or similar, and they must be securely connected to the garage door opener unit. Misalignment, obstructions, power failures, or faulty wiring can all trigger the ten-flash error code.
The sending sensor indicates its functionality by emitting a steady light. The receiving sensor, when aligned correctly and receiving the beam, will also illuminate with a steady light. If either sensor's light is off, flashing, or dim, it indicates a potential problem with that specific sensor or its wiring. The diagnostic lights on the sensors are crucial indicators for identifying the source of the issue.
Beyond the basic components, the wiring connecting the sensors to the opener unit plays a critical role. Damaged, frayed, or poorly connected wires can disrupt the signal and lead to the ten-flash error. Even seemingly minor damage to the wiring can interfere with the sensor's operation. Furthermore, staple placement during installation can sometimes damage the wires, leading to intermittent or complete signal failure.
Diagnosing the Cause of the Ten Flashes
The diagnostic process begins with a visual inspection of the safety sensors. Check both sensors for any signs of physical damage, such as cracks, breaks, or loose components. Ensure that the sensor lenses are clean and free from dirt, dust, or debris. Use a soft cloth to gently clean the lenses, avoiding harsh chemicals that may damage the plastic. Check for the presence of spider webs or other obstructions that could be interfering with the light beam.
Next, examine the alignment of the sensors. Ensure that the sensors are facing each other directly. Minor misalignments can disrupt the beam and trigger the error code. Loosen the mounting brackets and carefully adjust the sensors until they are properly aligned. Some models include an alignment indicator light that simplifies this process. If no indicator light is present, manually align the sensors until both exhibit steady illumination.
After verifying the physical integrity and alignment, inspect the wiring connecting the sensors to the garage door opener unit. Trace the wires from each sensor back to the opener, looking for any signs of damage, such as cuts, frays, or splices. Check the wire connections at both the sensor and opener ends, ensuring that they are secure and properly seated. If any damaged wiring is found, it should be repaired or replaced with new wiring of the same gauge and type.
If the wiring appears intact, use a multimeter to test the voltage at the sensor terminals. Refer to the garage door opener's manual for the correct voltage specifications. If the voltage is not within the specified range, it indicates a problem with the power supply to the sensors, which may be due to a faulty transformer or wiring within the opener unit itself. Further investigation of the opener's internal components might be necessary.
Another potential issue could be the sensitivity settings of the safety sensors. Some models allow for adjustment of the sensor's sensitivity. If the sensitivity is set too low, the sensor may not reliably detect the beam, even when properly aligned. Consult the opener's manual for instructions on adjusting the sensitivity settings. Increasing the sensitivity may resolve the issue.
Troubleshooting Steps to Resolve the Error
Once the potential cause of the ten flashes has been identified, targeted troubleshooting steps can be taken to resolve the error. If misalignment is suspected, carefully realign the sensors following the instructions provided earlier. If an obstruction is present, remove it and ensure that the beam path is clear. If damaged wiring is found, repair or replace it, taking care to ensure proper connections.
If cleaning and adjusting the sensors does not resolve the issue and the voltage readings are within acceptable parameters, a power cycle of the garage door opener is recommended. This involves disconnecting the power to the opener for a short period (typically 30 seconds to a minute) and then reconnecting it. This can sometimes reset the system and clear the error code.
If the problem persists after a power cycle, consider replacing the safety sensors. Sensors can degrade over time, especially if exposed to harsh environmental conditions. Replacement sensors are readily available from various retailers, and installation is typically straightforward. Ensure that the replacement sensors are compatible with the specific Craftsman garage door opener model.
When replacing the safety sensors, pay close attention to the wiring connections. Ensure that the wires are properly connected to the correct terminals. Incorrect wiring can cause further problems and may damage the sensors or the opener unit. Refer to the opener's wiring diagram for guidance.
If all troubleshooting steps fail to resolve the ten-flash error, it may indicate a more complex problem with the garage door opener's control board or other internal components. In such cases, it is recommended to consult a qualified garage door repair technician. Attempting to repair the control board without proper expertise can be dangerous and may cause further damage.
Preventive maintenance is crucial for minimizing the occurrence of garage door opener problems, including issues with the safety sensors. Regularly inspect the sensors for damage, cleanliness, and alignment. Periodically check the wiring for any signs of wear or damage. Lubricate the moving parts of the garage door and opener, including the hinges, rollers, and chain or belt. Addressing minor issues promptly can prevent them from escalating into more serious problems.
Finally, always consult the Craftsman garage door opener's user manual for specific troubleshooting information and safety precautions. The manual provides detailed information about the opener's features, operation, and maintenance procedures. Following the manufacturer's recommendations can help ensure the safe and reliable operation of the garage door opener for years to come.

How To Fix A Garage Door Opener That Won T Close The Lights Blink 10 Times

My Garage Door Won T Close And Blinks 10 Times American Veteran

Troubleshooting For Garage Opener Light Blinking Blog

Garage Door Lights Flashing Flickering Most Common Causes

Garage Door Won T Close Safety Sensor Troubleshooting Lights Blink 10 Times Opener Tips And Tricks

How To Close Garage Door When Light Is Blinking

Troubleshooting Craftsman 1 2hp Garage Opener With 5 Blinking Lights Home Improvement Stack Exchange

Accessibility Tools

Troubleshooting Craftsman 1 2hp Garage Opener With 5 Blinking Lights Home Improvement Stack Exchange

Garage Door Won T Close Safety Sensor Troubleshooting Lights Blink 10 Times Opener Tips And Tricks
Related Posts