How To Frame Up a Garage Wall: A Comprehensive Guide
Framing a garage wall, whether for new construction or renovation, is a fundamental carpentry skill. A well-framed wall provides structural integrity, defines space, and provides a surface for insulation and finishing materials. This article provides a detailed step-by-step guide on how to frame a garage wall, covering material selection, layout, assembly, and erection.
Key Point 1: Planning and Preparation
Prior to any physical construction, careful planning and preparation are essential. This stage involves several crucial steps, including obtaining necessary permits, selecting appropriate lumber, and developing a detailed framing plan.
1.1 Permits and Building Codes: Before commencing any construction work, it is imperative to consult local building codes and obtain the necessary permits. Codes vary significantly by location and dictate specific requirements for wall height, stud spacing, fire resistance, and other structural considerations. Ignoring these regulations can result in costly delays, fines, or even the need to dismantle and rebuild the wall.
1.2 Material Selection: The choice of lumber is critical for the structural integrity of the garage wall. Typically, pressure-treated lumber is recommended for the sill plate (the bottom horizontal piece that sits on the concrete slab) due to its resistance to moisture and insect damage. For the studs, top plates, and headers, kiln-dried lumber is commonly used. Dimensional lumber sizes, such as 2x4 or 2x6, are selected based on the wall height, load-bearing requirements, and local building codes. The quality of the lumber is also important – select straight, dry pieces free from excessive knots or warping.
1.3 Tools and Equipment: Having the right tools will significantly improve the efficiency and accuracy of the framing process. Essential tools include:
* Measuring Tape: For accurate measurements and layout.
* Level (4-foot and 2-foot): To ensure plumb and level walls.
* Square (Framing and Speed Square): For marking accurate 90-degree angles.
* Circular Saw: For cutting lumber to length.
* Drill/Driver: For fastening lumber with screws.
* Hammer: For driving nails (though screws are generally preferred for framing).
* Nail Gun/Screw Gun (Optional): For faster fastening.
* Safety Glasses: To protect eyes from debris.
* Gloves: For hand protection.
* Chalk Line: To create straight lines for layout.
* Ladder or Step Stool: For reaching higher areas.
1.4 Framing Plan: A detailed framing plan is a blueprint for the wall, outlining the dimensions, stud spacing, location of openings (doors and windows), and header sizes. This plan should be based on the architectural plans and building codes. It is beneficial to draw the plan to scale, indicating the location of each stud, header, and blocking.
1.5 Material List: Based on the framing plan, create a detailed material list, including the quantity and dimensions of all lumber, fasteners (nails or screws), and other necessary components. This list will ensure that sufficient materials are on hand before starting the project, minimizing delays and trips to the lumber yard.
Key Point 2: Wall Assembly
With the planning and preparation complete, the next step is to assemble the wall on a flat, level surface. This typically involves constructing the wall frame on the garage floor or a similar area.
2.1 Layout: Begin by laying out the top and bottom plates parallel to each other on the floor, ensuring they are the correct length according to the framing plan. Use a chalk line to mark the locations of the studs on both the top and bottom plates. Standard stud spacing is 16 inches on center (OC), meaning the center of each stud is 16 inches from the center of the adjacent stud. However, local codes may require different spacing. Accurately mark stud locations, including those around door and window openings.
2.2 Stud Installation: Cut the studs to the correct length. The length of the studs will determine the height of the wall. Ensure that all studs are cut to the same length to maintain a level top plate. Place the studs between the top and bottom plates, aligning them with the marked locations. Fasten the studs to the top and bottom plates using nails or screws. When using nails, drive them in at an angle (toe-nailing) to provide a stronger connection. When using screws, use two or three screws per connection for added stability. Ensure each stud is plumb using a level before securing it permanently.
2.3 Header Installation: Headers are structural members that span the openings for doors and windows, transferring the load from above to the studs on either side of the opening. Determine the appropriate header size based on the width of the opening and the load-bearing requirements, consulting local building codes or a structural engineer if necessary. Install the header above the opening, ensuring it is level and securely fastened to the jack studs (also called trimmer studs) on either side. Jack studs are typically doubled or tripled to provide sufficient support. Cripple studs are short studs placed above the header and below the sill of window openings to provide support for the wall sheathing.
2.4 Corner Posts and Partition Wall Connections: At the corners of the garage and where the framed wall connects to other walls, install corner posts to provide a solid connection. Corner posts are typically constructed by using three studs to create a strong and stable corner. When connecting the framed wall to an existing partition wall, ensure the connection is secure by overlapping the new studs with the existing studs and fastening them together.
2.5 Sheathing Attachment (Optional): In some cases, it is practical to attach wall sheathing (such as plywood or OSB) to the framed wall while it is still lying horizontally on the floor. This can simplify the process and improve accuracy. However, it will also make the wall heavier and more difficult to lift into place. If sheathing is attached before erection, ensure it is properly aligned and fastened according to local building codes.
Key Point 3: Wall Erection and Bracing
Once the wall is assembled, it is ready to be erected (raised into its vertical position) and secured. This process requires careful planning and may require assistance, especially for long or heavy walls.
3.1 Positioning and Lifting: With assistance, carefully lift the framed wall into its vertical position, aligning the bottom plate with the marked location on the concrete slab. Ensure the wall is properly oriented, with the sheathing facing the correct direction (if applicable). Use caution when lifting the wall to avoid injury. Work in a coordinated manner with assistants to ensure the wall is raised safely and efficiently.
3.2 Securing the Bottom Plate: Once the wall is in place, securely fasten the bottom plate (sill plate) to the concrete slab using concrete anchors or powder-actuated fasteners. The type and spacing of the fasteners will be determined by local building codes. Ensure the bottom plate is properly aligned with the foundation and that the fasteners are driven in straight and flush with the surface.
3.3 Plumb and Level: Use a level to ensure the wall is plumb (perfectly vertical). Make adjustments as needed by shimming between the bottom plate and the concrete slab. Once the wall is plumb, temporarily brace it in place using diagonal braces made from 2x4 lumber. Attach the braces to the wall studs and to stakes driven into the ground or to the existing structure. These braces will hold the wall plumb while it is being permanently secured.
3.4 Attaching the Top Plate: Secure the top plate of the framed wall to the existing structure (e.g., roof rafters, ceiling joists, or adjacent walls). This connection will provide lateral support for the wall and prevent it from tipping over. Use appropriate fasteners, such as nails or screws, to make a strong and secure connection. Ensure the top plate is properly aligned with the existing structure and that the fasteners are driven in at an angle for maximum holding power.
3.5 Permanent Bracing: After the top plate is secured, install permanent bracing to provide long-term stability for the wall. This may include diagonal bracing within the wall itself, or connecting the wall to adjacent walls or structural members. The type and amount of bracing will depend on the wall's height, length, and location.
3.6 Inspections: After the wall is erected and secured, it is essential to schedule an inspection by a local building inspector. The inspector will verify that the wall is built according to code and that it meets the required structural standards. Do not proceed with any further construction until the wall has been approved by the inspector.
3.7 Further Considerations:
* Electrical Wiring: When framing, consider the placement of electrical wiring within the walls. Plan for the location of outlets, switches, and light fixtures. Drill holes through the studs for running electrical wiring, ensuring the holes are far enough from the edges to prevent damage from nails or screws. Follow all electrical codes and safety regulations.
* Plumbing: If plumbing is to be installed within the walls, plan for the location of pipes and fixtures. Drill holes through the studs for running plumbing pipes, ensuring the holes are appropriately sized and spaced. Follow all plumbing codes and safety regulations.
* Insulation: When framing, consider the type of insulation that will be used in the walls. This will affect the stud spacing and the depth of the wall cavity. Ensure the framing is designed to accommodate the chosen insulation material.
By following these steps carefully and adhering to local building codes, framing a garage wall can be accomplished successfully, creating a solid and durable structure that will stand the test of time.

How To Frame Garage Door Opening For Most Roll Up Doors

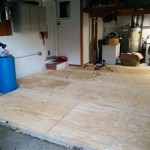
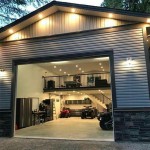
Garage Wall Build

How To Frame For A Garage Door Doors Done Right And Openers

Framing Walls Inside A Metal Garage Episode 1

How To Frame A Wall 3 Easy Steps

How To Frame For A Garage Door Doors Done Right And Openers

How To Build A Wall In An Existing Home Angela Marie Made

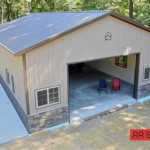
How To Build A Garage Addition Add More Storage With Bump Out

How To Build A Garage Addition Add More Storage With Bump Out

How To Build A Wall In An Existing Home Angela Marie Made
Related Posts