How To Pour A Cement Garage Floor
Pouring a concrete garage floor is a significant undertaking that requires careful planning and execution. While it can be a challenging DIY project, the rewards of a durable and functional garage floor are well worth the effort. This article outlines the crucial steps involved in pouring a cement garage floor effectively.
Planning and Preparation
Before beginning any physical work, thorough planning is essential. This phase involves several key considerations:
- Obtaining necessary permits: Check with local authorities regarding building permits and any local regulations that may apply to your project.
- Calculating concrete volume: Accurately determine the volume of concrete needed based on the dimensions of the garage floor. Use online calculators or consult with concrete suppliers for assistance.
- Arranging concrete delivery: Schedule concrete delivery in advance to ensure a seamless pouring process. Coordinate the delivery time with your work schedule and the availability of any helpers.
- Gathering tools and materials: Compile a comprehensive list of all necessary tools and materials, including lumber, stakes, string lines, a concrete mixer (if not using ready-mix), shovels, rakes, screeds, floats, and finishing trowels. Having everything on hand before starting will prevent delays.
Site Preparation and Formwork
Proper site preparation is crucial for a level and stable concrete slab. This involves:
- Excavation and Compaction: Excavate the area to the desired depth, ensuring a uniform and level surface. Compact the soil thoroughly using a hand tamper or a mechanical compactor. Proper compaction prevents settling and cracking of the concrete slab.
- Gravel Base: Add a layer of gravel, typically 4 to 6 inches thick, over the compacted soil. This layer provides drainage and further stabilizes the base.
- Vapor Barrier Installation: Lay a vapor barrier, such as 6-mil polyethylene sheeting, over the gravel base. Overlap the seams by several inches and seal them with tape. This barrier prevents moisture from migrating up through the concrete.
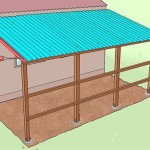
- Formwork Construction: Build formwork around the perimeter of the garage floor using 2x4 lumber. Secure the forms with stakes, ensuring they are straight, level, and properly braced to withstand the pressure of the concrete.
Reinforcement
Reinforcing the concrete slab enhances its structural integrity and resistance to cracking. The following steps are essential:
- Wire Mesh Installation: Place welded wire mesh or rebar within the forms, supported by chairs or bricks to keep it elevated within the concrete pour. This reinforcement helps distribute loads and prevent cracking.
- Expansion Joint Material Placement: Install expansion joint material around the perimeter of the garage and at any points where the slab meets existing structures. Expansion joints allow for the natural expansion and contraction of the concrete, preventing cracking.
Pouring and Finishing
The pouring and finishing process requires careful coordination and efficient execution:
- Concrete Placement: Pour the concrete into the forms, starting at one corner and working systematically across the area. Use shovels and rakes to spread the concrete evenly.
- Screeding: Use a screed board to level the concrete surface, working it back and forth across the forms to remove excess concrete and create a flat surface.
- Floating: After the concrete has begun to set, use a bull float or hand float to smooth the surface and embed any aggregate. This process further refines the surface texture.
- Troweling (Optional): For a smoother finish, use a steel trowel after the concrete has further hardened. Troweling creates a dense, hard surface.
- Control Joints: Create control joints using a groover or by sawing the concrete after it has partially hardened. Control joints create weakened planes in the concrete, controlling where cracks may occur.
- Curing: Cure the concrete by keeping it moist for several days. This can be achieved by covering the slab with plastic sheeting or by applying a curing compound. Proper curing is essential for developing the concrete's full strength and durability.
Post-Pouring Considerations
After the concrete has cured, some final steps are necessary:
- Form Removal: Carefully remove the formwork once the concrete is strong enough to support itself.
- Sealing (Optional): Applying a concrete sealer can enhance the appearance and protect the surface from stains and moisture.

Concrete Garage Floor Demolition Setup And Pour

Pouring A Concrete Garage Floor Ed And Raised

How To Pour A Concrete Garage Floor With Weather Lip

Pouring And Hand Finishing Concrete Garage Floor Timelapse

How To Pour A Concrete Slab For Beginners Diy

How To Pour A Garage Floor 11 Steps With Pictures Wikihow

How To Pour A Concrete Slab Diy Family Handyman

How To Pour A Concrete Slab Diy Family Handyman

How To Pour A Garage Floor 11 Steps With Pictures Wikihow

How To Pour A Concrete Slab In 13 Simple Steps
Related Posts