How to Install an Outside Garage Door Opener
Installing an outside garage door opener involves more than simply mounting a control panel; it requires careful planning, understanding of electrical systems, and precise execution to ensure safe and reliable operation. This article provides a detailed guide to the process, addressing key considerations and outlining the necessary steps.
Understanding Garage Door Opener Types and Compatibility
Before commencing installation, it is crucial to understand the different types of garage door openers available and their compatibility with the existing garage door and surrounding structure. Garage door openers are broadly classified into several types, each with its own set of advantages and disadvantages.
Chain drive openers are among the most common and affordable options. They use a metal chain to move the trolley that opens and closes the garage door. While robust, they can be noisy and require regular lubrication. Belt drive openers, on the other hand, utilize a rubber belt instead of a chain. This results in significantly quieter operation, making them ideal for garages located near living spaces. However, they typically command a higher price point.
Screw drive openers employ a threaded steel rod to move the door. These openers generally require less maintenance than chain drive models but can be sensitive to temperature fluctuations. Direct drive openers feature a motor that is directly connected to the door's torsion bar, eliminating the need for a chain, belt, or screw. They are known for their quiet operation and minimal maintenance, but they can be more expensive.
Finally, jackshaft openers are mounted on the wall beside the garage door, rather than on the ceiling. This makes them suitable for garages with high ceilings or limited headroom. They operate by directly turning the torsion bar that lifts the door. Compatibility depends on the weight and size of the garage door, as well as the available mounting space and electrical configuration. Consult the manufacturer's specifications to ensure the chosen opener is suitable for the specific garage door.
It is also important to consider the opener's safety features, such as photoelectric sensors that prevent the door from closing if an obstruction is detected and automatic reversal mechanisms that stop the door if it encounters resistance.
Preparing for Installation: Tools, Materials, and Safety Precautions
Proper preparation is essential for a successful garage door opener installation. This involves gathering the necessary tools and materials, as well as implementing appropriate safety precautions to prevent accidents and injuries. The required tools typically include a drill with various drill bits, a socket wrench set, adjustable wrenches, screwdrivers (both flathead and Phillips head), a level, a measuring tape, a hammer, safety glasses, and work gloves. In some cases, a stud finder may also be helpful to locate suitable mounting points.
The materials needed will depend on the specific garage door opener model and installation requirements. However, they commonly include mounting brackets, hardware (such as bolts, nuts, and screws), wiring connectors, and additional lengths of wire if the existing wiring is insufficient. It may also be necessary to purchase additional lumber or metal supports if the existing garage structure is not adequate to support the opener's weight.
Safety should be the top priority during the installation process. Disconnect the power to the garage door circuit breaker before beginning any electrical work. Wear safety glasses to protect the eyes from debris and work gloves to prevent cuts and abrasions. If the garage door has torsion springs, do not attempt to adjust or repair them unless properly trained and equipped. Torsion springs are under high tension and can cause serious injury if mishandled. Enlist the help of another person to assist with lifting and positioning heavy components, such as the garage door opener motor unit.
Carefully review the manufacturer's instructions before starting the installation. The instructions will provide specific guidance on the correct procedures and may include diagrams or illustrations to aid in understanding. Pay close attention to any warnings or cautions provided by the manufacturer.
Step-by-Step Installation Guide: Mounting, Wiring, and Adjustments
The installation process can be broken down into several key steps, each requiring careful attention to detail. Disconnect the existing garage door from the opener (if applicable) and manually operate the door to ensure it moves smoothly and freely. Address any issues with the door's balance or track alignment before proceeding.
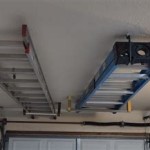
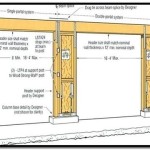
Next, locate the ceiling joists above the garage door opening. Use a stud finder to identify the center of each joist. The opener's mounting brackets will need to be securely attached to these joists. If the joists are not aligned in a way that allows for proper mounting, install a header board across the joists to provide a solid mounting surface. Secure the header board with lag screws or other appropriate fasteners. Then, attach the mounting brackets to the header board, ensuring they are properly aligned and level.
Carefully lift the garage door opener motor unit into position and attach it to the mounting brackets. Use the provided hardware to securely fasten the unit in place. Ensure the unit is centered above the garage door opening and that it is level. Attach the rail to the motor unit and extend it towards the garage door. Support the rail with temporary supports or have an assistant hold it in place while attaching the door arm to the rail and the garage door. The door arm should be positioned so that it pulls the door straight up and down without binding. Use the provided hardware to securely fasten the door arm to the garage door. Consider reinforcing the door if needed with metal struts if the door is lightweight.
Now comes the wiring. Connect the opener to a dedicated electrical circuit. Follow the manufacturer's instructions carefully, as incorrect wiring can damage the opener or create a safety hazard. Typically, this involves connecting the opener's power wires to the house's electrical system using wire connectors. Secure the wiring to the ceiling or wall to prevent it from hanging loose. Install the wall-mounted control panel in a convenient location near the garage door. Connect the control panel to the opener motor unit using the provided wiring. Test the control panel to ensure it operates the door correctly.
Install the safety sensors (photoelectric eyes) on either side of the garage door opening, near the floor. The sensors should be positioned so that they are aligned with each other and that the beam of light between them is unobstructed. Connect the sensors to the opener motor unit using the provided wiring. Test the sensors by interrupting the beam of light while the door is closing. The door should stop and reverse direction. Adjust the opener's travel limits so that the door opens and closes completely without binding or overrunning. Most openers have adjustment screws for setting the up and down limits. Fine-tune the sensitivity settings to prevent the door from stopping unnecessarily if it encounters slight resistance.
Finally, test the opener thoroughly. Open and close the door several times, checking for smooth operation, proper alignment, and reliable safety features. Make any necessary adjustments to ensure the opener is functioning correctly. Lubricate all moving parts, such as the chain or belt, according to the manufacturer's recommendations.
Regular maintenance is crucial for extending the life of the garage door opener. Inspect the opener regularly for loose hardware, worn parts, and proper lubrication. Tighten any loose bolts or screws, replace worn parts as needed, and lubricate moving parts according to the manufacturer's recommendations. Periodic inspections will help to identify and address potential problems before they become major issues.
Consider adding a surge protector to protect the garage door opener from power surges. Power surges can damage the opener's electronic components and shorten its lifespan. A surge protector can help to prevent this damage. The integration of smart home features into garage door openers allows for remote monitoring and control via a smartphone or other device. This can provide added convenience and security. The exterior keypad allows for easy access to the garage without a remote control or key. This can be particularly useful for family members who do not have access to a remote or key.
Remember to familiarize oneself with local building codes and regulations related to garage door opener installations. These codes may specify certain requirements for safety features, wiring, and mounting. Compliance with these codes is essential for ensuring the safety and legality of the installation.

How To Open A Garage Door Manually From The Outside Inside

Install Garage Door Quick Release Lock

How To Install A Garage Door Opener With Pictures Wikihow

How To Install A Garage Door Opener With Pictures Wikihow

How To Install A Garage Door Opener The Home Depot

How To Open A Garage Door Manually From The Outside Inside

How To Install A Garage Door Opener The Home Depot

Garage Door Help How To Reset A Keypad Outside

Benefits Of A Garage Door Opener Keypad The Genie Company

Easily Install A Wireless Keypad For Your Garage Door Simple Diy
Related Posts